Here's an easy step by step guide, pay attention now:
- You'll need Alcohol 120% , get it HERE
- Once it's done downloading, double click it to install it, follow the steps (keep clicking "Next", but make sure to uncheck the tick box "Alcohol Soft toolbar", click next then click "Install")
- Uncheck "Add Alcohol Virtual Drive at first run", keep the check mark on "Run Alcohol 120%" and click finish OR
- Go to your desktop, double click the "Alcohol 120%" icon.
- Click "Ok" on the registration screen
- Wait for it to "Apply virtual device settings"
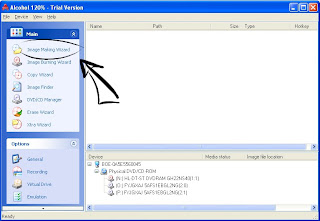
-Now in the list on the left, click "Image Making Wizard"

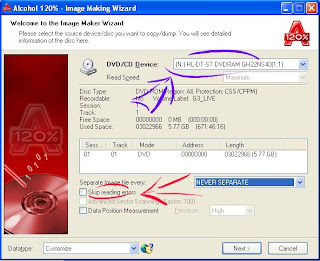
- In this screen, choose device name (if you have multiple DVD drives, choose the one with the DVD you want to make an image of) and then depending on how scratched up your DVD is, you may want to check/Uncheck "Skip Reading Errors" check it if your DVD's scratched.

Leave the rest of the options alone, you don't need them now. Click "Next".
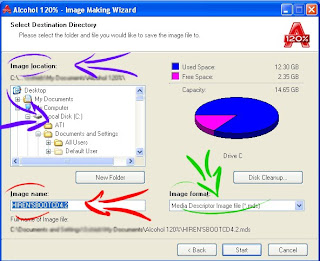
- Now first of all: Select where you want to place the image file on your pc.
- Next : Name your image, use the original software name is my advice, as things get hectic when you have too many obscurely named images. Kudos for any names like "ROFLCOPTER" and the like, though.
- Finally; Choose the image format. I won't get into details on this one, but suffice it to say, ISO is the standard and is highly compatible with almost any image mounting program. But i would choose mds, this'll usually generate two files. Image name.MDF and Image name.MDS. You need both in the same place for them to work, but for now, choose ISO.
 Click Start, wait for the image to be written and Voila ! You have yourself a newly made image.
Now how to use it? You can either google it, or wait a day and i'll post another tutorial for that.
Cheers !
Mosab


No comments:
Post a Comment